Introduction to Air Fryer Garlic Bread
Air fryer garlic bread is a universally loved side dish that adds a delicious touch to any meal, from pasta to soups and even salads. Traditionally baked in the oven, garlic bread has been enjoyed in homes and restaurants for years. However, with the rise of air fryers, a new method for cooking garlic bread has taken the culinary world by storm. Air frying garlic bread offers a quicker, more efficient, and often tastier way to prepare this beloved treat.
Why should you switch to an air fryer for making garlic bread? For one, the air fryer cooks garlic bread much faster than a traditional oven, without needing to preheat. This makes it perfect for busy weeknights when you want something quick but delicious. In addition, the air fryer delivers evenly crispy bread, which is often difficult to achieve in a conventional oven.
Another advantage of using an air fryer is its energy efficiency. The air fryer consumes less energy than an oven, so you’re not only saving time but also helping the environment. Plus, the compact size of the air fryer makes it perfect for smaller kitchens or for anyone who doesn’t want to heat up their whole house by turning on the oven.
This article will walk you through everything you need to know about making air fryer garlic bread. From selecting the right ingredients to mastering the cooking process, we’ll cover it all. We’ll also provide tips, variations, and answers to frequently asked questions to ensure you get the most out of this versatile appliance.
By the end of this guide, you’ll be a pro at making perfectly crispy and flavorful air fryer garlic bread. Whether you’re preparing a side dish for a dinner party or a quick snack for yourself, this method is sure to become your new favorite.
2. Essential Ingredients for Air Fryer Garlic Bread
The key to making delicious air fryer garlic bread lies in choosing the right ingredients. Let’s break down what you’ll need:
- Bread: The foundation of any garlic bread recipe is, of course, the bread. French bread and Italian bread are the most commonly used varieties because they have a soft interior and a crusty exterior, which crisp up beautifully in the air fryer. If you prefer thicker slices, you can use Texas toast or even ciabatta. The type of bread you choose will impact the final texture, so feel free to experiment with different options until you find your favorite.
- Butter: Butter is what gives garlic bread its rich, indulgent flavor. Softened butter spreads easily and ensures that the garlic and herbs adhere well to the bread. If you’re looking for a healthier alternative, you can use olive oil or a combination of butter and oil. For those who prefer a dairy-free option, vegan butter works just as well.
- Garlic: Fresh garlic is essential for a bold and aromatic flavor. Mince the garlic finely so that it spreads evenly across the bread. If fresh garlic is too strong for your taste, you can substitute it with garlic powder. However, fresh garlic provides a more authentic and robust flavor.
- Seasonings: To elevate the flavor of your garlic bread, add Italian seasoning, a pinch of red pepper flakes, and salt. Italian seasoning typically includes a mix of dried herbs like oregano, basil, thyme, and rosemary, which complement the garlic and butter. Red pepper flakes add a subtle kick, but if you prefer a milder flavor, you can omit them.
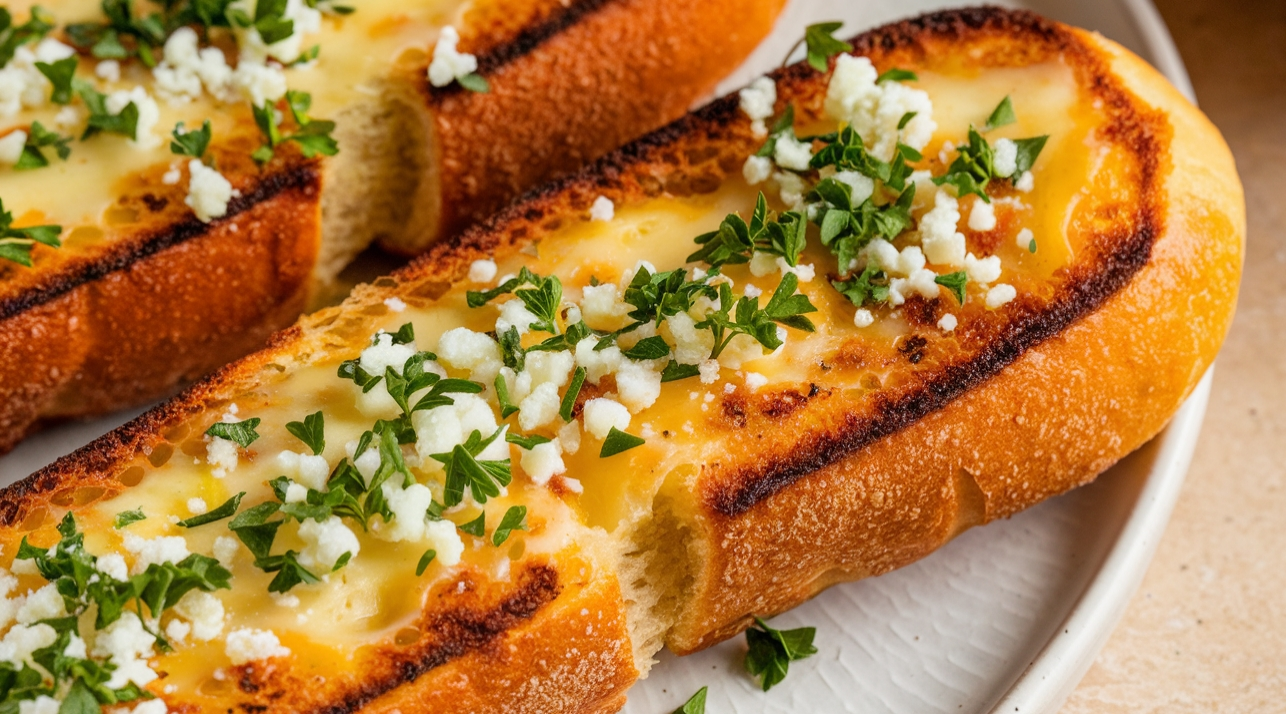
- Cheese (Optional): For a cheesy twist, sprinkle shredded mozzarella or Parmesan over the garlic bread before air frying. Mozzarella melts smoothly, creating a gooey, stretchy layer of cheese, while Parmesan adds a sharp, salty bite. You can use one or both types of cheese, depending on your preference.
When selecting ingredients, always aim for freshness, especially with the bread and garlic. Fresh ingredients yield the best flavor and texture, ensuring your air fryer garlic bread is a hit every time.
3. Step-by-Step Recipe: How to Make Air Fryer Garlic Bread
Now that we’ve covered the ingredients, let’s dive into the actual process of making air fryer garlic bread. Follow these simple steps to achieve crispy, golden, and flavorful results every time.
Step 1: Preheat the Air Fryer
Before you start, it’s important to preheat your air fryer. Preheating ensures that the garlic bread cooks evenly and crisps up nicely. Set the temperature to 350°F and let the air fryer heat for about 3-5 minutes. This step is especially crucial if you want the bread to be crispy on the outside while staying soft and tender on the inside.
Step 2: Prepare the Bread
prepare your bread. Slice the loaf in half lengthwise, or cut it into smaller pieces that will fit comfortably in the air fryer basket. If you’re using a larger loaf like French or Italian bread, you may need to trim the edges to ensure it fits. For thicker slices, like Texas toast, you may need to adjust the cooking time slightly to ensure the bread is fully cooked through.
Step 3: Mix the Garlic Butter
In a small bowl, combine the softened butter, minced garlic, Italian seasoning, red pepper flakes (if using), and a pinch of salt. Mix until all the ingredients are well combined and the butter is smooth. The garlic butter mixture should have a spreadable consistency, so make sure the butter is soft enough to blend easily.
Step 4: Spread the Garlic Butter
Using a spatula or brush, generously spread the garlic butter mixture over each slice of bread. Make sure to cover the entire surface, including the edges, for maximum flavor. If you’re adding cheese, now is the time to sprinkle it evenly over the buttered bread.
Step 5: Air Fry the Bread
Arrange the bread slices in the air fryer basket, ensuring they are not overlapping. Overcrowding the basket will prevent the air from circulating properly, resulting in uneven cooking. Depending on the size of your air fryer, you may need to cook the bread in batches.
Cook the bread at 350°F for 6-7 minutes. If you’re adding cheese, open the air fryer after 5 minutes and sprinkle the cheese on top. Close the air fryer and continue cooking for the remaining 1-2 minutes, until the cheese is melted and bubbly.
Step 6: Serve and Enjoy
Once the garlic bread is golden brown and crispy, remove it from the air fryer. Slice it into smaller pieces and serve immediately. Garlic bread is best enjoyed fresh and hot, so be sure to time it with the rest of your meal.
The entire process, from preparation to serving, takes under 10 minutes. This makes air fryer garlic bread a quick and easy side dish that you can whip up at a moment’s notice.
4. Tips and Tricks for Perfect Air Fryer Garlic Bread
Making air fryer garlic bread is simple, but these tips and tricks will help you elevate your recipe and ensure the best possible results every time.
Tip 1: Preheat the Air Fryer
Preheating the air fryer is crucial for achieving even cooking, as previously noted. Without preheating, you risk ending up with bread that’s crispy on top but soft or undercooked on the bottom. Taking the extra few minutes to preheat will make all the difference.
Tip 2: Don’t Overcrowd the Basket
It’s tempting to load the air fryer basket with as many slices as possible, but this will only prevent the bread from crisping properly. For the best results, cook the garlic bread in a single layer with some space between each slice. If you’re making a larger batch, cook in multiple batches.
Tip 3: Use Fresh Garlic
Freshly minced garlic provides a more intense flavor than garlic powder. If you love garlic, using fresh cloves will make your garlic bread more aromatic and flavorful. However, if you’re short on time or don’t have fresh garlic, garlic powder can be a convenient substitute.
Tip 4: Add Cheese Toward the End
If you’re adding cheese to your garlic bread, wait until the last 1-2 minutes of cooking to sprinkle it on. Adding cheese too early may cause it to burn or dry out before the bread is fully cooked. By adding it toward the end, you’ll get perfectly melted, gooey cheese on top.
Tip 5: Serve Immediately
Garlic bread is best enjoyed hot and fresh from the air fryer. As it cools, it may lose some of its crispiness, so be sure to time it so that it’s ready just before you’re about to serve your meal. If you need to reheat the bread, the air fryer is still your best option, as it will restore the bread’s crispy texture without making it soggy.
5. Air Fryer Garlic Bread Variations
While classic garlic bread is always a hit, there are plenty of ways to get creative with this recipe. Here are a few variations to try:
Variation 1: Different Bread Types
Although French and Italian bread are the traditional choices for garlic bread, feel free to experiment with other types of bread. Texas toast, ciabatta, whole wheat bread, or even sourdough can add new flavors and textures. Texas toast gives you thick, hearty slices, while sourdough adds a tangy note that pairs well with garlic and butter.
Variation 2: Garlic Powder Substitution
If you don’t have fresh garlic on hand, garlic powder is a good alternative. Add approximately 1/4 teaspoon of garlic powder for each garlic clove. While garlic powder has a milder flavor, it’s still a great way to add that signature garlic taste to your bread.
Variation 3: Cheesy Garlic Bread
Cheese lovers will enjoy adding a layer of mozzarella or Parmesan to their garlic bread. Mozzarella melts into a gooey, stretchy topping, while Parmesan adds a sharp, nutty flavor. You can even mix the two for the ultimate cheesy garlic bread. For something different, try cheddar or Colby Jack, which offer a bolder flavor.
Variation 4: Herb-Infused Garlic Butter
For an extra layer of flavor, mix fresh or dried herbs into your garlic butter. Basil, parsley, and oregano all pair wonderfully with garlic and butter. Fresh herbs like parsley add a burst of color, while dried herbs add a more concentrated flavor. You can also sprinkle the finished garlic bread with fresh parsley for garnish.
Variation 5: Spicy Garlic Bread
If you like a little heat, increase the amount of red pepper flakes or add a pinch of cayenne pepper to your garlic butter. The spicy kick pairs well with the richness of the butter and garlic, creating a flavor-packed side dish.
These variations allow you to customize your garlic bread to suit your taste preferences. Whether you prefer a cheesy, spicy, or herby version, there’s a garlic bread recipe for everyone.
6. How to Make Frozen Garlic Bread in the Air Fryer
Frozen garlic bread is a convenient option when you’re short on time or want to keep a quick side dish on hand. Luckily, you can easily cook frozen garlic bread in the air fryer, achieving crispy and delicious results without the need to preheat the oven.
Here’s how to make frozen garlic bread in the air fryer:
- Preheat the Air Fryer: Set your air fryer to 350°F and let it preheat for 3-5 minutes.
- Place the Frozen Garlic Bread in the Basket: Once preheated, place the frozen garlic bread directly into the air fryer basket. You can cook as many slices as will fit in a single layer, but don’t overcrowd the basket.
- Cook for 5 Minutes: Air fry the frozen garlic bread for about 5 minutes. Check halfway through to ensure the bread is cooking evenly. Depending on the thickness of the bread and the brand you’re using, cooking times may vary slightly, so keep an eye on it.
- Serve and Enjoy: Once the bread is golden and crispy, remove it from the air fryer and serve immediately.
Frozen garlic bread typically requires less cooking time than fresh bread because it’s already partially cooked. By air frying it, you get the same crispy texture and delicious flavor as fresh garlic bread without the hassle of thawing or baking.
This method is perfect for busy weeknights or when you need a quick snack or side dish. It’s also great for those times when you have unexpected guests and need to whip up something fast.
7. How to Reheat Garlic Bread in the Air Fryer
Reheating garlic bread can be tricky, as microwaving tends to make it soggy and ovens can take too long. Fortunately, the air fryer is the perfect tool for reheating garlic bread, restoring its crispy texture while keeping the inside soft and warm.
Here’s how to reheat garlic bread in the air fryer:
- Preheat the Air Fryer: Set your air fryer to 350°F and let it preheat for a few minutes.
- Place the Garlic Bread in the Basket: Arrange the leftover garlic bread slices in a single layer in the air fryer basket. Make sure the pieces aren’t overlapping to allow for even reheating.
- Reheat for 2-3 Minutes: Air fry the garlic bread for 2-3 minutes, checking halfway through. The bread should be warm and crispy by the time it’s done.
- Serve Hot: Remove the garlic bread from the air fryer and serve it immediately.
Reheating garlic bread in the air fryer is a quick and effective way to bring it back to life without sacrificing texture. It’s much faster than using an oven and avoids the sogginess that often occurs with microwaving.
If you have leftover cheesy garlic bread, the air fryer will also melt the cheese evenly while keeping the bread crispy. This method works well for both store-bought and homemade garlic bread.
8. What to Serve with Air Fryer Garlic Bread
Air fryer garlic bread is a versatile side dish that pairs well with a variety of meals. Whether you’re serving it alongside a hearty pasta dish or using it to complement a light salad, garlic bread adds a delicious and satisfying element to your meal. Here are a few popular pairings:
Pasta Dishes
Garlic bread is the perfect accompaniment to Italian pasta dishes like spaghetti, lasagna, fettuccine Alfredo, and baked ziti. The crispy bread is ideal for soaking up rich pasta sauces, adding texture and flavor to each bite.
Soups
Pair your garlic bread with a warm bowl of soup for a comforting meal. Tomato basil soup and garlic bread are a classic combination, while minestrone, French onion, and creamy potato soups also pair well with this crispy side dish.
Grilled Meats
Garlic bread works beautifully alongside grilled or roasted meats such as chicken, steak, or pork chops. The bread’s crispy texture contrasts nicely with the juicy meats, and the garlic flavor enhances the overall meal.
Salads
For a lighter meal, serve garlic bread with a fresh salad. A Caesar salad topped with garlic bread croutons is a particularly popular choice, while mixed greens, arugula, and caprese salads are also excellent pairings.
Appetizer Platters
Garlic bread makes a great addition to an appetizer platter or charcuterie board. Pair it with dips like hummus, spinach and artichoke dip, or marinara sauce for a crowd-pleasing starter.
No matter what you’re serving, air fryer garlic bread elevates any meal with its crispy texture and bold flavor. It’s easy to prepare, making it a go-to side dish for both casual dinners and special occasions.
9. Nutritional Information
If you’re curious about the nutritional content of air fryer garlic bread, here’s a basic breakdown for a standard serving, assuming you’re using French bread, butter, and garlic:
- Calories: 353 per serving
- Carbohydrates: 48g
- Protein: 10g
- Fat: 13g
- Saturated Fat: 7g
- Cholesterol: 27mg
- Sodium: 590mg
- Fiber: 3g
- Sugar: 6g
Keep in mind that these numbers can vary depending on the ingredients you use. For example, adding cheese will increase the calorie, fat, and sodium content. If you’re looking to reduce the fat content, you can use olive oil or a light butter substitute instead of regular butter. Whole wheat bread is another option that provides more fiber and slightly fewer carbohydrates.
For those on specific diets, like low-carb or keto, there are low-carb bread options available that can be used to make garlic bread in the air fryer. You can also reduce the butter or use a lower-sodium alternative if you’re watching your salt intake.
By adjusting the ingredients, you can make air fryer garlic bread that fits your dietary preferences without sacrificing flavor.
10. FAQs Section
Based on common questions from the “People Also Ask” section on Google, here are some frequently asked questions about it:
How long to cook garlic bread in an air fryer?
Garlic bread typically takes 6-7 minutes to cook in an air fryer preheated to 350°F. The exact time may vary depending on the thickness of the bread and the size of your air fryer. Keep an eye on the bread to prevent it from burning.
Can I use aluminum foil in the air fryer for garlic bread?
While you can use aluminum foil in the air fryer, it’s not necessary for garlic bread. In fact, cooking without foil allows the air to circulate freely around the bread, ensuring even crisping. If you do choose to use foil, be sure to leave space for air circulation.
How to cook frozen garlic bread in an air fryer?
To cook frozen garlic bread in an air fryer, preheat the air fryer to 350°F and cook the bread for 5 minutes. There’s no need to thaw the bread beforehand. Just place it directly into the air fryer and cook until crispy.
Can I reheat garlic bread in an air fryer?
Yes, the air fryer is one of the best tools for reheating garlic bread. Preheat the air fryer to 350°F and reheat the bread for 2-3 minutes. This method restores the crispy texture without making the bread soggy.
What type of bread is best for garlic bread in an air fryer?
French or Italian bread is ideal for air fryer garlic bread because of their soft interior and crusty exterior. However, you can also use Texas toast, ciabatta, sourdough, or whole wheat bread for a different texture or flavor.
11. Conclusion
Air fryer garlic bread is a simple, quick, and delicious way to enjoy a classic side dish with a modern twist. By using an air fryer, you can achieve perfectly crispy garlic bread in a fraction of the time it takes to bake in an oven. Whether you’re making a traditional recipe or experimenting with different variations like cheesy, spicy, or herb-infused garlic bread, it offers a convenient and reliable cooking method.
With just a few basic ingredients—bread, butter, garlic, and seasonings—you can whip up this versatile side dish in under 10 minutes. It pairs beautifully with a variety of meals, from pasta dishes to soups and grilled meats, making it a go-to recipe for busy weeknights or special occasions.
it also shines when it comes to reheating and cooking frozen garlic bread, offering a quick and effective solution for maintaining that irresistible crispy texture. Plus, the versatility of the air fryer allows you to customize the recipe to suit your dietary preferences or taste preferences.
Whether you’re an air fryer enthusiast or trying this method for the first time, air fryer garlic bread is sure to become a staple in your kitchen. So give it a try and enjoy the perfect balance of crispy, garlicky, and buttery goodness with every bite!