Introduction to Chocolate Mousse Cake
Chocolate mousse cake stands out as more than just a dessert—it’s truly a celebration of rich flavors and exquisite textures that tantalize the taste buds. Consequently, this beloved dessert combines the deep, decadent taste of chocolate with the light and airy texture of mousse, making it a favorite among chocolate enthusiasts worldwide. Whether it’s for a special occasion or simply a delightful treat to indulge in, making a chocolate mousse cake offers an experience that brings joy to both the baker and the eater.
History and Origin of Chocolate Mousse Cake
Chocolate mousse originated in France, where mousse (meaning “foam” in French) was first served as a dessert in the 18th century. Over time, the concept of mousse evolved, and the chocolate mousse we know today became popular in the early 20th century, thanks to the widespread availability of chocolate. Indeed, pastry chefs likely innovated the idea of incorporating mousse into cakes, combining the best of both worlds—the solid structure of cake and the ethereal lightness of mousse. As a result, chocolate mousse cake became a staple in patisseries and high-end restaurants, loved for its sophistication and rich, yet balanced, flavor profile.
Essential Ingredients for Chocolate Mousse Cake
To create a perfect chocolate mousse cake, you must start with the best possible ingredients. Here’s a detailed look at each essential component:
- Chocolate: First and foremost, the star of the cake. Opt for high-quality chocolate with a cocoa content of at least 60% for a rich flavor. The type of chocolate you choose—whether dark, milk, or white—will significantly affect the cake’s sweetness and intensity. For more insights into the various types of chocolate, you can refer to this guide.
- Cream: Heavy cream plays a vital role in both the mousse and the cake’s frosting. Full-fat cream ensures a creamy texture and stable peaks when whipped. Consequently, the richness of the cream complements the bitterness of the chocolate, creating a balanced taste.
- Eggs: Eggs give the mousse its structure, adding richness and helping it set properly. For a lighter mousse, you can separate the eggs and whip the whites separately before folding them into the chocolate mixture.
- Sugar: Sugar is necessary to balance the bitterness of the chocolate and adds a subtle sweetness to the mousse and cake layers. However, you can adjust the amount based on the type of chocolate you use.
- Vanilla Extract: A good vanilla extract enhances the chocolate flavor without overpowering it. Just a teaspoon can make a noticeable difference in the depth of flavor.
- Gelatin (optional): Gelatin may be used to stabilize the mousse, especially if the cake will be served in warm conditions. Alternatively, for a vegetarian option, agar-agar works as a substitute.
Baking Equipment Needed
Before starting, it is essential to gather all the necessary tools and equipment to make your chocolate mousse cake:
- Mixing Bowls: Prepare to use a variety of mixing bowls in different sizes for the cake batter, mousse, and other components.
- Spatulas: Flexible spatulas are ideal for folding ingredients together without deflating the mousse.
- Cake Pans or Mousse Rings: Depending on the recipe, you might need springform pans, regular cake pans, or mousse rings for assembling the cake.
- Thermometers: A digital kitchen thermometer helps you check the temperature of the melted chocolate, ensuring it doesn’t get too hot, which could cause it to seize.
- Mixers: An electric hand mixer or stand mixer is essential for whipping the cream and eggs to the right consistency.
These tools will undoubtedly help you achieve the best results, ensuring your chocolate mousse cake turns out as intended.
Step-by-Step Guide to Making Chocolate Mousse Cake
Creating a chocolate mousse cake may seem complex, but with a detailed step-by-step guide, it becomes a manageable and enjoyable process. Follow these instructions carefully to make a show-stopping cake that’s as delicious as it is beautiful.
Preparing the Cake Base
The base of your chocolate mousse cake can vary depending on your preference and the specific recipe you choose. Here are some popular options:
- Sponge Cake: Light and airy, a sponge cake provides a soft base that complements the mousse’s texture. It’s ideal for those who prefer a less dense cake.
- Brownie: For a richer, more decadent base, a brownie layer works beautifully. It adds a chewy texture and intense chocolate flavor that pairs well with the mousse.
- Cookie Crust: A cookie crust, made from crushed cookies and butter, offers a crunchy contrast to the smooth mousse. It’s an excellent choice for those who enjoy a bit of texture in their dessert.
Once you’ve chosen your base, here’s how to prepare it:
- Mix the Ingredients: First, prepare your chosen cake or crust base according to the recipe’s instructions. For a sponge cake, ensure that you beat the eggs and sugar until light and fluffy to incorporate enough air into the batter.
- Bake the Base: Then, pour the batter into a greased and lined cake pan or press the cookie mixture into the bottom of the pan. Bake according to the recipe’s instructions, usually at around 350°F (175°C) until done.
- Cool Completely: After baking, allow the cake base to cool completely in the pan. This step is crucial to prevent the mousse from melting when added on top.
Making the Chocolate Mousse
The mousse is the heart of the chocolate mousse cake. It should be light, airy, and full of chocolate flavor. Here’s how to make the perfect chocolate mousse:
- Melt the Chocolate: Begin by melting your chocolate. You can do this in a double boiler or in the microwave in short bursts. To avoid any issues, do not overheat the chocolate, as this can cause it to seize or lose its temper. Learn more about the proper technique for melting chocolate.
- Whip the Cream: While the chocolate cools slightly, whip the heavy cream until soft peaks form. This step is crucial for achieving the right mousse texture. Over-whipping can cause the cream to turn grainy, while under-whipping may result in a runny mousse. For best results, refer to whipping cream techniques.
- Fold the Chocolate into the Cream: Once the chocolate has cooled to lukewarm, gently fold it into the whipped cream. The key here is to fold slowly and carefully to avoid deflating the mousse.
- Add Gelatin (Optional): If you’re using gelatin for added stability, dissolve it in a small amount of warm water, then fold it into the mousse mixture. Make sure the gelatin is fully dissolved to avoid lumps in the mousse.
- Chill the Mousse: Once combined, refrigerate the mousse to allow it to set. This can take anywhere from 2 to 4 hours, depending on the thickness of the mousse layer.
Assembling the Cake
With the mousse and cake base ready, it’s time to assemble the cake:
- Layer the Mousse Over the Cake Base: First, remove the cooled cake base from the pan and place it on your serving dish. Then, spread the chocolate mousse evenly over the top, ensuring it reaches the edges.
- Smooth the Top: Use a spatula to smooth the top of the mousse layer. For a more refined look, you can use a bench scraper or the back of a large knife.
- Chill to Set: Next, refrigerate the assembled cake for at least 4 hours, or overnight if possible, to allow the mousse to fully set.
- Remove from the Pan: Finally, if using a springform pan, carefully release the sides before serving. If you used mousse rings, gently slide them off.
Popular Variations of Chocolate Mousse Cake
One of the beauties of chocolate mousse cake is its versatility. Here are some popular variations that you can try to suit different tastes and dietary needs:
Triple Chocolate Mousse Cake
This version is a chocolate lover’s dream. It involves creating three layers of mousse using dark, milk, and white chocolate. Each layer is poured and set before adding the next, resulting in a beautiful, layered effect. The contrast in flavors and colors makes this cake visually stunning and delightfully complex.
Steps to Make It:
- Prepare the mousse as described earlier, using different types of chocolate for each layer.
- Begin with the dark chocolate layer, followed by the milk chocolate, and finish with the white chocolate mousse.
- Ensure each layer sets before adding the next.
Vegan Chocolate Mousse Cake
For those who are vegan or lactose intolerant, a vegan chocolate mousse cake is a delicious alternative. This version typically uses coconut cream in place of dairy cream and dairy-free chocolate.
Ingredients:
- Coconut cream (chilled)
- Dairy-free chocolate (dark chocolate with a high cocoa content is ideal)
- Sweeteners such as maple syrup or agave nectar
- Vanilla extract
Preparation:
- First, whip the chilled coconut cream until fluffy.
- Then, melt the dairy-free chocolate and fold it into the whipped coconut cream.
- Sweeten to taste with your preferred sweetener.
Flourless Chocolate Mousse Cake
A flourless chocolate mousse cake is perfect for those who need a gluten-free dessert option. This cake is dense and rich, typically made with a chocolate base that uses ground nuts or just eggs and chocolate for structure.
Steps to Make It:
- First, prepare a flourless chocolate base using melted chocolate, eggs, and butter.
- Then, bake and cool the base before adding the chocolate mousse layer.
- This cake is dense and fudgy, making it a perfect match for the light mousse on top.
Chocolate Mousse Cheesecake
For those who love both cheesecake and mousse, this variation combines the two. The cheesecake layer provides a rich, tangy contrast to the sweet and airy mousse.
Steps to Make It:
- First, prepare a classic cheesecake base using cream cheese, sugar, and eggs.
- Once baked and cooled, spread a layer of chocolate mousse over the top.
- Finally, refrigerate to set before serving.
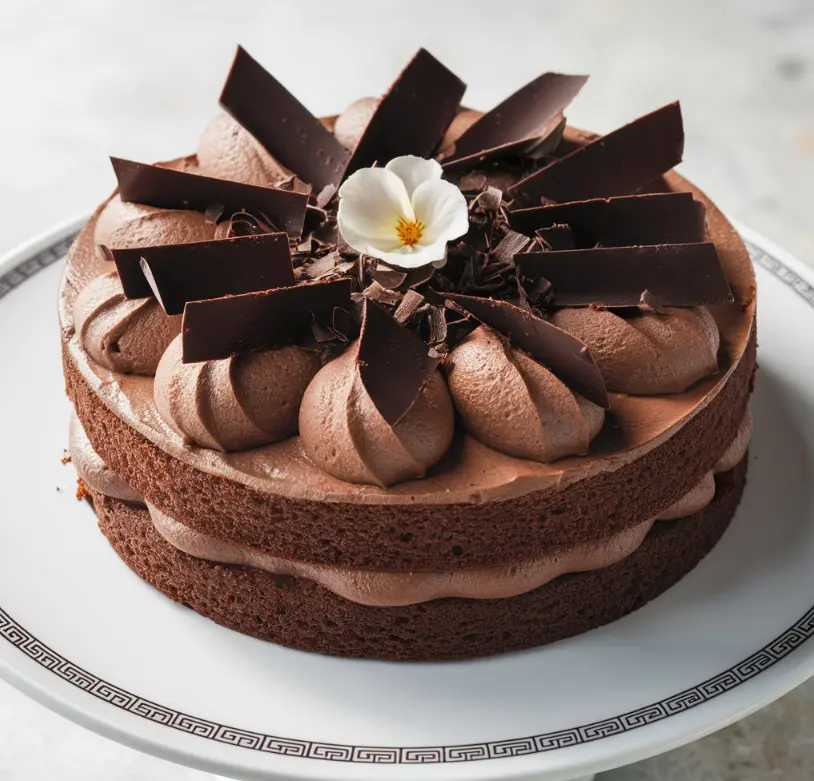
Presentation and Decoration Tips
Once your chocolate mousse cake is assembled, you can focus on presentation. Here are some tips to make your cake look as good as it tastes:
Garnishing Ideas
Garnishing adds visual appeal and can enhance the flavor of your cake. Consider these ideas:
- Chocolate Shavings: Use a vegetable peeler to create curls from a block of chocolate. Scatter them over the top of the cake for an elegant touch.
- Fresh Berries: Raspberries, strawberries, and blueberries provide a burst of color and a tart contrast to the rich chocolate.
- Whipped Cream: Add a dollop of whipped cream on each slice, or pipe decorative swirls around the edge of the cake.
- Edible Flowers: For a sophisticated look, consider garnishing with edible flowers such as violets or pansies.
Serving Suggestions
How you serve your cake can enhance the overall experience. Here are some suggestions:
- Pair with Coffee: The bitterness of coffee complements the sweetness of the chocolate, making it a perfect accompaniment.
- Wine Pairing: A glass of port or a rich red wine can enhance the flavors of the cake, particularly if it’s made with dark chocolate.
- Fruit Sauces: A drizzle of raspberry or orange sauce can add a bright, tangy contrast to the richness of the mousse.
Expert Tips for Perfect Chocolate Mousse Cake
To ensure your chocolate mousse cake turns out perfectly every time, consider these expert tips:
- Temperature Matters: When folding melted chocolate into whipped cream, make sure the chocolate is lukewarm—not hot, but not cold. If the chocolate is too hot, it will deflate the cream; if it’s too cold, it can seize and create lumps.
- Choosing the Right Chocolate: The type of chocolate you choose can significantly impact the flavor of your mousse. For a less sweet, more intense flavor, opt for a chocolate with at least 70% cocoa content. If you prefer a sweeter mousse, milk chocolate is a great option.
- Stabilizing the Mousse: If you plan to transport the cake or serve it in warm weather, consider adding a bit of gelatin or agar-agar to the mousse. This will help it hold its shape and prevent it from melting.
- Avoid Overmixing: When folding ingredients together, use a gentle hand. Overmixing can cause the mousse to lose its light, airy texture and become dense.
- Test for Doneness: If your cake base is baked, always test it with a toothpick inserted into the center. It should come out with a few moist crumbs attached, indicating that the cake is done but still moist.
Troubleshooting Common Issues
Even with careful preparation, things can sometimes go wrong. Here’s how to troubleshoot common issues with chocolate mousse cake:
- Mousse Not Setting Properly: If your mousse isn’t setting, you might have under-whipped the cream or didn’t allow enough chilling time. Make sure your cream is whipped to soft peaks before folding in the chocolate, and give the mousse plenty of time to chill.
- Cake Layers Separating: If the mousse separates from the cake base when sliced, it’s likely that the cake base wasn’t cool enough when you added the mousse. Always ensure the base is completely cool before layering.
- Overly Sweet or Bitter Mousse: Adjust the sweetness of your mousse by choosing the right type of chocolate. If it’s too sweet, use a higher percentage of dark chocolate. If it’s too bitter, try adding a bit more sugar or using milk chocolate.
Frequently Asked Questions
How do I store chocolate mousse cake?
- Chocolate mousse cake should be stored in the refrigerator. Cover it loosely with plastic wrap or place it in an airtight container to prevent it from absorbing other odors. It can be stored for up to 3 days.
Can I make chocolate mousse cake ahead of time?
- Absolutely! In fact, making it a day ahead can improve the flavor as the mousse has more time to set and the flavors meld together. Just be sure to store it properly in the fridge.
What’s the best type of chocolate to use?
- The best chocolate for mousse depends on your taste preferences. For a rich, bittersweet flavor, use dark chocolate with a cocoa content of 60-70%. For a sweeter, creamier taste, opt for milk chocolate.
Can I freeze chocolate mousse cake?
- Yes, you can freeze chocolate mousse cake. To do so, wrap the cake tightly in plastic wrap, then place it in an airtight container. It can be frozen for up to 1 month. To thaw, transfer it to the refrigerator and let it thaw overnight.
What can I use instead of gelatin?
- If you’re looking for a vegetarian alternative to gelatin, agar-agar is a great option. It’s a seaweed-derived gelling agent that works well in mousses and other desserts. Use it in the same way you would use gelatin, but be aware that it sets more firmly and quickly.
Conclusion
Creating a chocolate mousse cake from scratch is a rewarding experience that allows you to showcase your culinary skills. With the right ingredients, tools, and techniques, you can make a dessert that’s not only delicious but also visually stunning. Whether you stick to the classic version or try one of the variations mentioned, this cake is sure to impress anyone who tries it.
Remember, the key to a perfect chocolate mousse cake lies in the quality of the ingredients and the care you take in preparing each component. So, take your time, enjoy the process, and savor every bite of the final product. take a look about the recipe of allreipes Chocolate Mousse Cake Recipe (allrecipes.com).