Introduction
Creme Brulee is a classic dessert known for its creamy custard base and its signature caramelized sugar topping. The contrast between the smooth custard and the crisp, caramelized sugar makes this dessert a favorite among many. However, achieving the perfect caramelization requires the right technique. In this guide, you’ll learn how to caramelize Crème Brûlée, ensuring that every bite offers the perfect balance of textures and flavors.
What is Creme Brulee?
Creme Brulee, meaning “burnt cream” in French, is a dessert that dates back to the 17th century. It features a creamy custard base crowned with a crunchy layer of caramelized sugar. The custard is typically flavored with vanilla, though variations include chocolate, coffee, and citrus flavors.
The magic of Creme Brulee lies in the contrast between the creamy custard and the crunchy sugar topping. When served, the sugar layer is often cracked with the back of a spoon, revealing the smooth custard underneath. This textural contrast is what makes Crème Brûlée so delightful.
To make Creme Brulee at home, you’ll need to master both the custard and the caramelization process. While the custard is relatively straightforward, achieving the perfect caramelized topping can be challenging. But with the right tools and techniques, you can create a dessert that rivals those from the finest restaurants.
Tools and Equipment Needed for Caramelizing Brulee
To caramelize Brulee, you’ll need specific tools. The most common and effective tool is a kitchen torch. This handheld device allows you to apply direct heat to the sugar, caramelizing it quickly without affecting the custard underneath.
If you don’t have a kitchen torch, don’t worry. There are alternatives. You can use your oven’s broiler, although it requires careful monitoring. A stovetop method is also possible, though less common. Every method has its advantages and drawbacks, which we will examine closely.
Using a kitchen torch is the safest and most precise method. It gives you control over the heat and allows for even caramelization. If you’re using a broiler, the process is less controlled, and you risk burning the sugar or heating the custard too much. However, with careful attention, it can work well in a pinch.
When using the stovetop method, you’ll caramelize sugar in a pan before pouring it over the custard. This method requires precision to avoid burning the sugar, and it can be tricky to achieve an even layer. Regardless of the method, safety is paramount. Always use heat-resistant gloves when working with hot tools, and be cautious to avoid burns.
Ingredients Required
To caramelize Brulee, you need a few key ingredients. First, you’ll need granulated sugar. This kind of sugar is ideal for Crème Brûlée because it melts uniformly and forms a smooth, glassy finish. Some recipes suggest using brown sugar for a deeper flavor, but granulated sugar is preferred for its consistency.
Next, you’ll need the prepared custard base. This is typically made with cream, egg yolks, sugar, and vanilla. Ensure your custard is fully set and chilled before attempting to caramelize the sugar. A well-set custard will hold up under the heat, while a loose custard may become watery.
Finally, have a small amount of water on hand if you’re using the stovetop method. A few drops of water can help the sugar dissolve evenly and prevent burning. However, water isn’t necessary if you’re using a kitchen torch or broiler.
Step-by-Step Guide to Caramelizing Brulee
1. Preparing the Custard
Before you can caramelize brulee sugar, you need to prepare the custard. Start by preheating your oven to 325°F (160°C). In a medium saucepan, heat heavy cream until it’s hot but not boiling. In a separate bowl, whisk together the egg yolks and sugar until the mixture is pale and thick. Slowly pour the hot cream into the egg mixture, whisking constantly to prevent curdling. Stir in vanilla extract.
Pour the mixture into ramekins, and place them in a baking dish. Pour hot water into the dish until it comes halfway up the sides of the ramekins. Bake the custards for 30-40 minutes, or until they’re set but still slightly jiggly in the center. Let them cool to room temperature, then refrigerate for at least 4 hours or overnight.
2. Choosing the Right Sugar
The kind of sugar you choose significantly influences the final outcome. Granulated sugar is the most commonly used and gives the best results. Its fine crystals melt evenly, creating a smooth, glass-like surface. Brown sugar, while flavorful, tends to burn more quickly and can create a grainy texture. For the best results, stick with granulated sugar.
Spread a thin, even layer of sugar over the surface of each chilled custard. Be sure the sugar covers the entire surface, as any exposed custard could burn under the intense heat. For an extra-thin layer, sift the sugar through a fine mesh sieve directly onto the custard.
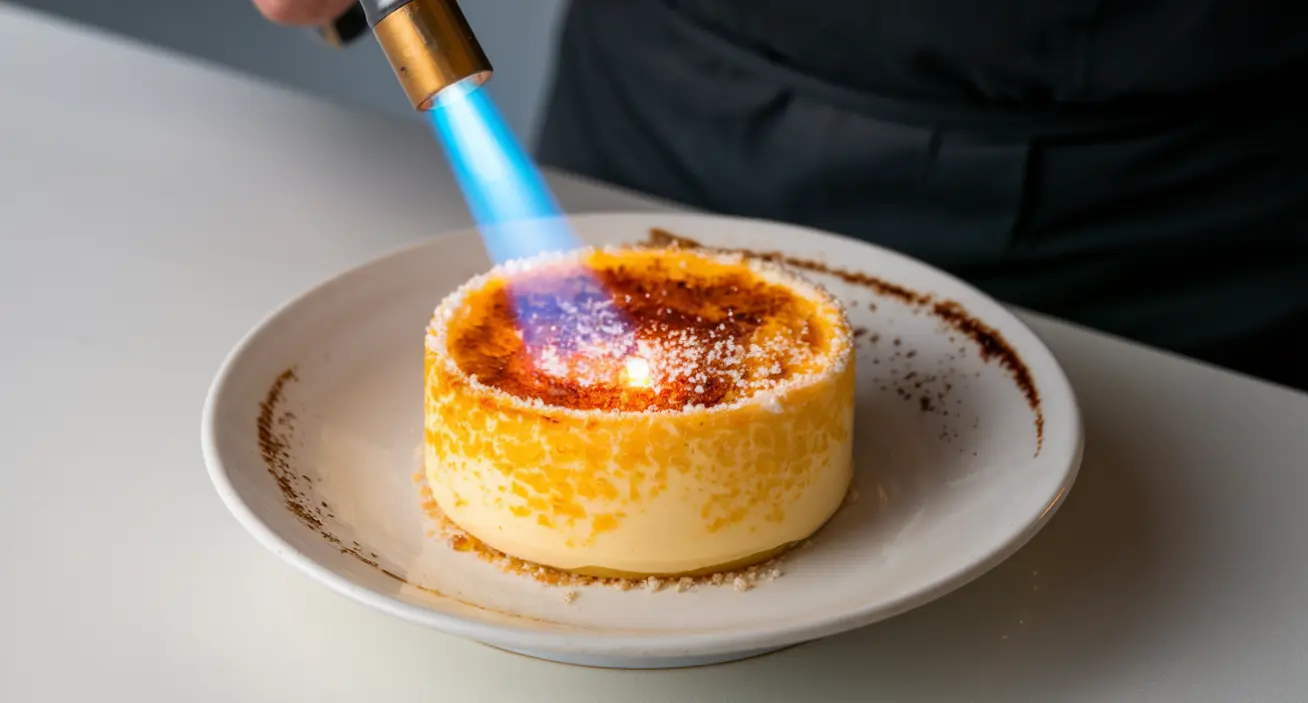
3. Using a Kitchen Torch
Hold the kitchen torch about 4-5 inches away from the sugar. Move it in a circular motion, evenly heating the sugar until it melts and turns a deep golden brown. Avoid holding the flame in one spot for too long, as this can cause burning.
The sugar will start to bubble and melt, forming a smooth, caramelized surface. Once the entire surface is caramelized, let it cool for a minute or two. This allows the sugar to harden into a crisp layer. If you want a thicker layer, you can add a second coating of sugar and repeat the process.
4. Alternative Methods
If you don’t have a kitchen torch, you can use your oven’s broiler. Preheat the broiler and place the ramekins on the top rack. Broil for 1-3 minutes, watching closely to prevent burning. The sugar should melt and caramelize quickly. However, be cautious, as the broiler’s high heat can easily overcook the custard.
For the stovetop method, melt sugar in a pan over medium heat until it’s a deep amber color. Carefully pour the hot caramel over the chilled custard, tilting the ramekin to spread it evenly. This method requires precision, as the sugar can burn easily if left unattended.
Common Mistakes to Avoid
Caramelize Brulee, it’s easy to make mistakes that can ruin the dessert. One common mistake is burning the sugar. This happens when the sugar is heated too quickly or for too long. To avoid this, always move the torch in a circular motion and keep it at a consistent distance from the sugar.
Another mistake is uneven caramelization. This occurs when the sugar is spread too thickly or unevenly across the custard. To fix this, use a fine mesh sieve to evenly distribute the sugar over the custard’s surface. If you notice any areas that are not caramelizing, apply more heat in those spots.
Overcooking the custard is another issue to watch for. The custard should be fully set before caramelizing, but not overcooked. If the custard is overcooked, it will become grainy and lose its smooth texture. To prevent this, always check the custard’s doneness before removing it from the oven. The center should still be slightly jiggly when you take it out.
Tips for Achieving the Perfect Caramelization
Achieving the perfect caramelization requires attention to detail. First, ensure that the sugar is evenly distributed across the custard’s surface. Any clumps of sugar can result in uneven caramelization. Use a fine mesh sieve to sift the sugar directly onto the custard, ensuring an even layer.
Next, be patient and take your time. Rushing the caramelization process can lead to burning. Hold the torch at a consistent distance from the sugar, moving it in a circular motion to ensure even heating. If you’re using a broiler, monitor the custard closely, as the high heat can cause rapid burning.
Another tip is to use the right type of sugar. Granulated sugar is the best choice for Crème Brûlée because it melts uniformly and forms a smooth, glassy finish. If you prefer a deeper flavor, you can mix in a small amount of brown sugar, but be cautious, as it burns more easily.
Finally, practice makes perfect. Caramelize Brulee can be tricky, especially if you’re new to it. Don’t be discouraged if your first attempt isn’t perfect. With practice, you’ll learn how to control the heat and achieve the perfect caramelization every time.
FAQs
Can I use brown sugar instead of granulated sugar?
Yes, you can use brown sugar, but it requires more attention. Brown sugar adds a deeper, molasses-like flavor to the caramelized topping. However, it burns more easily than granulated sugar and can create a grainy texture if not melted properly. If you choose to use brown sugar, mix it with granulated sugar to balance the flavor and texture.
What should I do if the sugar burns?
If the sugar burns, it can impart a bitter taste to the Creme Brulee. Unfortunately, once the sugar is burnt, there’s no way to reverse it. The best solution is to carefully scrape off the burnt sugar and try again with a new layer of sugar. To prevent burning in the future, keep the torch moving and avoid holding it too close to the sugar.
How long should I wait before serving after Caramelize Brulee ?
After caramelizing the sugar, wait about 1-2 minutes before serving. This allows the sugar to harden into a crisp layer. However, don’t wait too long, as the sugar may soften or become sticky if left for an extended period. For the best results, serve Crème Brûlée immediately after caramelizing.
Is it possible to caramelize without a torch?
Yes, you can caramelize Crème Brûlée without a torch by using your oven’s broiler. Place the ramekins on the top rack under the broiler, and watch closely as the sugar caramelizes. The broiler’s high heat can quickly burn the sugar, so keep a close eye on it. If you don’t have a broiler, you can also use the stovetop method, though it’s more challenging to achieve an even caramelization.
How do I fix uneven caramelization?
Uneven caramelization usually happens when you don’t evenly distribute the sugar or when you apply heat unevenly. To fix this, sprinkle a small amount of sugar over the areas that didn’t caramelize, and apply more heat. If the unevenness is severe, you may need to scrape off the sugar and start again.
Troubleshooting: What to Do When Things Go Wrong
Caramelize Brulee isn’t always straightforward. Sometimes, things can go wrong, but with the right techniques, you can salvage your dessert. If the sugar burns, carefully remove it and start over with a fresh layer. Be sure to move the torch in a circular motion and avoid holding it too close to the sugar.
If you undercook the custard, it may not hold up under the heat of caramelization. To fix this, refrigerate the custard for a few hours until it fully sets. If you overcook the custard, it may become grainy. Unfortunately, there’s no way to reverse this, so it’s important to monitor the custard closely while it’s baking.
Salvaging a botched caramelization can be challenging, but it’s possible with patience and practice. If the sugar layer is too thick, scrape off the excess and try again with a thinner layer. If the sugar doesn’t caramelize evenly, apply more heat to the under-caramelized areas, or add a small amount of sugar to those spots and torch them again.
Conclusion
Caramelize Brulee is a delicate process that requires the right tools, ingredients, and techniques. With practice and attention to detail, you can achieve a perfectly caramelized sugar topping that complements the creamy custard underneath. Whether you’re using a kitchen torch, broiler, or stovetop, the key is to apply even heat and avoid rushing the process.
Remember, the best Creme Brulee is one that balances textures and flavors. The crisp, caramelized sugar should crack under the pressure of a spoon, revealing the smooth custard beneath. With the tips and techniques outlined in this guide, you’re well on your way to mastering the art of caramelizing Crème Brûlée.