Introduction to Pepperidge Farm Garlic Bread
Pepperidge Farm Garlic Bread has become a staple in many households. It’s known for its crispy crust, buttery garlic center, and convenience. Whether you’re hosting a family gathering or preparing a quick meal, it’s the go-to bread for adding flavor without any hassle.
You can easily find this frozen garlic bread in most grocery stores. The appeal lies not only in its delicious taste but also in how quick and easy it is to prepare. With just a few minutes in the oven, you can have fresh garlic bread ready to serve.
In this article, we’ll cover everything you need to know about how to cook Pepperidge Farm Garlic Bread. From detailed cooking instructions to tips on enhancing the flavor, you’ll discover how to make the most out of this product. We’ll also discuss its nutritional value, ingredient list, and answer some common questions.
If you’ve ever wondered how to achieve perfect garlic bread every time, you’ve come to the right place. This guide will provide you with step-by-step instructions, along with creative ideas to elevate your garlic bread experience.
Step-by-Step Instructions for Cooking Pepperidge Farm Garlic Bread
Cooking Pepperidge Farm Garlic Bread is incredibly simple, even for beginners. There are different methods depending on how crispy or soft you want the bread to be. In this section, we’ll walk through each method, ensuring that you get perfect results every time.
Conventional Oven Instructions
The conventional oven method is the most common and recommended way to cook Pepperidge Farm Garlic Bread. Here’s how to do it:
- Preheat the oven to 400°F (200°C). This high temperature is essential to get that crisp, golden-brown crust.
- Remove the bread from the packaging. Make sure you take off all plastic wrapping and place the bread halves, cut-side up, on a baking sheet.
- If the bread halves are frozen together, carefully separate them with a fork. This ensures even cooking for both halves.
- Place the baking sheet on the middle oven rack to allow for balanced heat distribution.
- Bake the bread for 8 to 9 minutes, checking to make sure it doesn’t burn. The edges should be golden, and the center should be warm and soft.
- Once done, remove from the oven and allow it to cool for a minute or two before serving. This keeps you from burning your mouth with the hot garlic spread.
This method provides a crispy texture on the outside with a warm, soft center. It’s ideal for those who love the crunch that comes with freshly baked bread.
Soft-Center Option
If you prefer a soft texture, there’s an alternative method you can follow:
- Preheat the oven to 350°F (180°C), which is slightly lower than the conventional method.
- Wrap the entire loaf in aluminum foil. This helps to retain moisture inside the bread, preventing it from becoming too crispy.
- Place the foil-wrapped bread on a baking sheet and bake it for 30 to 35 minutes.
- After baking, remove the foil and let the bread rest for a minute before cutting it. The bread should be soft all the way through, with the garlic spread evenly distributed.
This method is perfect for those who enjoy a more tender bread texture, without the crunchy crust. It’s also great for children or anyone who prefers a softer bite.
Things to Avoid
While cooking garlic bread may seem foolproof, there are a few things to avoid to ensure the best results.
- Do not microwave the bread. Microwaving frozen garlic bread can make it soggy. The texture will be far from the crisp and tender balance you get with the oven.
- Avoid overcooking. Garlic bread can dry out quickly if left in the oven too long. Set a timer and check the bread at the minimum recommended time to avoid burning it.
- Do not bake directly on a rack. Always use a baking sheet to catch any garlic butter that may drip during baking.
These simple tips will help you avoid common pitfalls and ensure you enjoy delicious garlic bread every time.
ingredients in Pepperidge Farm Garlic Bread
Knowing what goes into your food is important, especially if you have dietary restrictions or preferences. Pepperidge Farm Garlic Bread is made with high-quality ingredients to provide a delicious, fresh-baked taste.
The bread base is made from unbleached enriched wheat flour. This is a common type of flour used in bread-making, providing a hearty and sturdy structure. Other ingredients include water, yeast, soybean oil, salt, and a touch of sugar. These elements combine to create a soft yet firm bread that holds up well during baking.
The garlic spread is where most of the flavor comes from. It’s made from margarine, which provides the buttery texture, and real garlic. The garlic is either dehydrated or in extract form, giving the bread its signature taste. The spread also includes parsley for a hint of freshness, along with some natural flavors to enhance the garlic.
One of the standout features of this garlic bread is that it contains no preservatives. This ensures that you get a fresher taste, similar to homemade garlic bread. It’s why the bread is frozen, allowing it to maintain freshness without the need for artificial preservatives.
These simple but high-quality ingredients come together to create a garlic bread that’s both flavorful and easy to prepare.
Nutritional Information and Dietary Considerations
Pepperidge Farm Garlic Bread is not just delicious—it also fits into various diets, though it’s important to keep an eye on its nutritional content. Each serving size is 50 grams, which is roughly a quarter of the loaf.
For each serving, you’ll get about 180 calories. This includes 8 grams of fat, with 3 grams being saturated fat. While this amount of fat isn’t too high, it’s important to be mindful of the saturated fats if you’re watching your intake.
The bread also contains 21 grams of carbohydrates and 1 gram of dietary fiber. There’s a small amount of sugar, just 1 gram per serving, which isn’t significant but is worth noting if you’re tracking sugar intake.
In terms of protein, you’ll get 4 grams per serving. While this isn’t a major source of protein, it can still contribute to your daily intake, especially if paired with protein-rich meals like pasta with meat sauce or grilled chicken.
The sodium content is 270 milligrams per serving. This is moderate, but if you’re on a low-sodium diet, it’s something to watch out for. Pepperidge Farm Garlic Bread does not contain trans fats or cholesterol, which can be a plus for heart health.
For those with allergies, it’s important to know that the bread contains wheat and soybean oil. This makes it unsuitable for individuals with gluten or soy allergies. However, it’s free of nuts, which is helpful for people avoiding nut allergens.
In summary, Pepperidge Farm Garlic Bread can be part of a balanced diet, but like all indulgent foods, moderation is key. By being aware of the nutritional content, you can better fit it into your meals without overindulging.
Tips for Enhancing Pepperidge Farm Garlic Bread
While Pepperidge Farm Garlic Bread is delicious as-is, there are plenty of ways to enhance its flavor. Whether you want to make it cheesier, garlicky, or more herb-infused, these tips will help you take your garlic bread to the next level.
Adding Cheese
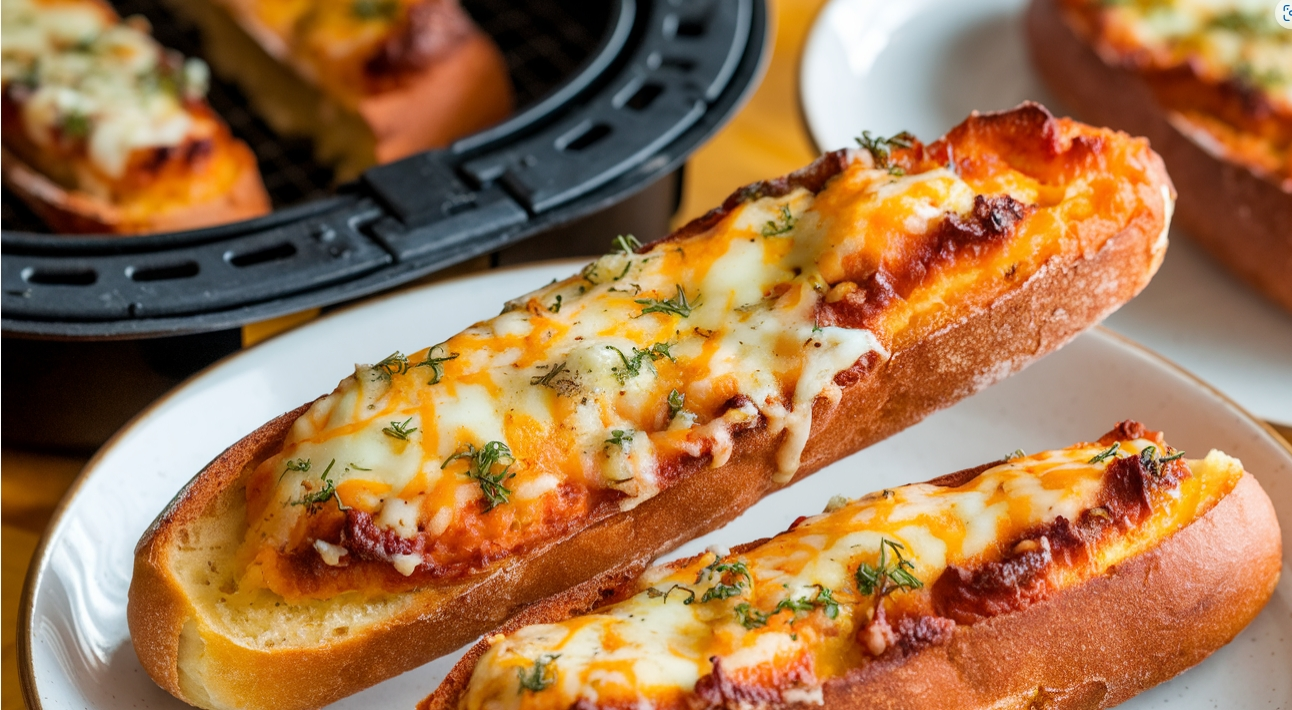
Cheese is a perfect companion for garlic bread. Mozzarella is a popular choice for its melty texture, but you can also use Parmesan for a sharper flavor. Cheddar and even provolone can be good options depending on your preference.
To add cheese, simply sprinkle it on the bread about halfway through the baking process. This ensures that the cheese melts evenly without burning. If you like a crispy cheese topping, you can add it at the start of the baking process. A mix of cheeses works well for an extra layer of flavor.
Cheese not only enhances the taste but also makes the bread more filling. It’s an excellent addition when serving garlic bread as a standalone snack.
Making It Extra Garlicky
If you love garlic, you can easily make your bread more garlicky. Start by finely mincing some fresh garlic. Before baking, spread the garlic onto the bread, pressing it into the existing garlic spread. This will intensify the garlic flavor.
Alternatively, you can use garlic powder or garlic salt if you want a subtler enhancement. Another option is to melt extra garlic butter and brush it on the bread after baking. This gives the bread a rich, buttery garlic flavor without overpowering it.
Using Fresh Herbs
Fresh herbs can elevate the flavor of your garlic bread, giving it a burst of freshness. After baking, sprinkle freshly chopped parsley, rosemary, or basil over the bread. These herbs add color and an aromatic quality that pairs beautifully with garlic.
If you’re a fan of Italian cuisine, consider adding a drizzle of extra virgin olive oil and a sprinkle of oregano. This gives the bread a Mediterranean flair, perfect for pairing with pasta dishes or salads.
Serving Suggestions
Pepperidge Farm Garlic Bread is incredibly versatile. It pairs well with pasta dishes like spaghetti, fettuccine Alfredo, or lasagna. The bread’s garlic flavor complements rich tomato sauces and creamy Alfredo sauces alike.
It also works well as a side for soups, especially tomato soup or minestrone. You can dip the bread into the soup for an extra garlicky bite. If you’re grilling, serve garlic bread alongside steaks, chicken, or fish. It adds a savory element that pairs well with smoky grilled meats.
If you’re feeling creative, you can even turn the garlic bread into a base for mini pizzas. Just add marinara sauce, cheese, and your favorite toppings, then bake for a few extra minutes. This transforms a simple side dish into a fun, flavorful appetizer or snack.
Storage and Leftover Ideas
After enjoying a meal with Pepperidge Farm Garlic Bread, you might find yourself with leftovers. Luckily, there are easy ways to store and repurpose leftover garlic bread to enjoy later.
Storing Unused Garlic Bread
If you haven’t baked all the bread yet, you can simply store the frozen portion in your freezer. The bread comes frozen, so it’s designed to last for several months. Make sure it remains sealed in its original packaging to prevent freezer burn.
Once the bread is baked, you should store leftovers in an airtight container. If you plan to eat the bread within a day or two, it’s fine to keep it at room temperature. If you need to store it for longer, refrigerate the bread.
For longer storage, you can freeze the baked garlic bread. Just wrap it tightly in aluminum foil or place it in a freezer bag. When you’re ready to enjoy it again, you can reheat it directly from frozen.
Reheating Instructions
To reheat leftover garlic bread, avoid the microwave, as it can make the bread soggy. Instead, preheat your oven to 350°F (180°C). Place the leftover bread on a baking sheet and heat it for about 10 minutes. This method helps maintain the crispy exterior while warming the inside.
If you’ve frozen the bread, you can reheat it straight from the freezer. Follow the same instructions, but add a few extra minutes to the baking time to ensure the bread heats through.
Creative Leftover Ideas
Leftover garlic bread can be transformed into several delicious dishes. One popular idea is to turn it into garlic croutons. Simply cut the bread into cubes and toast them in the oven until crispy. These croutons can be added to salads or soups for an extra burst of flavor.
You can also make garlic bread crumbs. Pulse the leftover bread in a food processor until it forms coarse crumbs. These crumbs can be used as a topping for casseroles, pasta dishes, or even baked fish.
Another fun idea is to use the leftover garlic bread as a base for sandwiches. Slice it in half and add your favorite fillings, such as turkey, cheese, and vegetables. The garlic flavor adds an extra dimension to your sandwich.
If you’re feeling adventurous, you can use the leftover garlic bread to make a garlic bread pudding. Mix it with eggs, milk, cheese, and your choice of vegetables or meats. Bake until golden and firm, and you’ve got a savory bread pudding that’s perfect for brunch or dinner.
Frequently Asked Questions (FAQs)
How do you cook frozen garlic bread in the oven?
Cooking frozen garlic bread is easy. Preheat your oven to 400°F, place the bread on a baking sheet, and bake it for 8 to 9 minutes until heated through and crispy.
Can you cook Pepperidge Farm garlic bread in an air fryer?
You can use air fryer. Preheat the air fryer to 350°F and cook the bread for 5 to 6 minutes. Check frequently to avoid overcooking.
Can I add extra toppings to the bread?
Yes! You can add cheese, herbs, or extra garlic butter to enhance the flavor. Just add these toppings before or during baking for the best results.
What temperature do you cook garlic bread at?
For a crispy crust, cook garlic bread at 400°F. If you prefer a softer texture, bake it at 350°F and wrap it in foil.
Is it possible to microwave Pepperidge Farm garlic bread?
While it’s possible, microwaving is not recommended. It can make the bread soggy, and you won’t get the same crispy texture that the oven provides.
How long can you keep frozen garlic bread before it spoils?
Frozen garlic bread can be kept in the freezer for up to six months. Just ensure that it remains sealed in its original packaging or in an airtight container to prevent freezer burn.
What can I pair with garlic bread for a complete meal?
Garlic bread pairs well with pasta dishes, soups, salads, and grilled meats. It’s a versatile side that complements both rich and light dishes.
Common Mistakes to Avoid When Cooking Garlic Bread
Although cooking garlic bread is simple, a few common mistakes can affect the final result. The first mistake is overbaking the bread. Overbaking can cause it to become too dry and hard. Always set a timer and check the bread a minute before the recommended cooking time ends.
Another common mistake is not preheating the oven. Failing to preheat the oven can lead to uneven cooking, resulting in a soggy or undercooked center. Always ensure your oven is fully preheated before placing the bread inside.
It’s also important to avoid using too much butter or oil when enhancing the bread. While garlic butter can add flavor, too much can make the bread greasy. Use a light hand when applying extra toppings.
Lastly, make sure to place the bread on a baking sheet instead of directly on the oven rack. The baking sheet helps distribute heat evenly and catches any butter that may drip during cooking. This not only makes cleanup easier but also prevents burning.
By avoiding these mistakes, you can ensure your garlic bread comes out perfect every time.
Why Choose Pepperidge Farm Garlic Bread?
There are many garlic bread options out there, but Pepperidge Farm Garlic Bread stands out for several reasons. One of the key benefits is the quality of the ingredients. The bread is made with unbleached enriched wheat flour, real garlic, and no preservatives. This focus on natural ingredients results in a fresher, more authentic flavor compared to other frozen bread products.
The bread is also incredibly convenient. Whether you’re hosting a dinner party or need a quick side dish for a weeknight meal, Pepperidge Farm Garlic Bread is ready in just minutes. You don’t need to worry about making garlic bread from scratch, which saves time and effort.
Additionally, the bread is consistent in flavor and texture. Every loaf bakes up the same, with a perfect balance between the crispy crust and soft, garlicky center. This consistency makes it a reliable choice for any meal.
Whether you’re preparing a quick snack or serving a large meal, Pepperidge Farm Garlic Bread delivers on taste and convenience. It’s a trusted product that has been enjoyed by families for generations.
Conclusion
Pepperidge Farm Garlic Bread is not only easy to cook but also versatile and delicious. Whether you follow the conventional method for a crispy crust or prefer the soft-center option, this guide has covered all the best ways to enjoy it.
You can enhance it with cheese, garlic, and fresh herbs, or keep it simple for a classic flavor. It pairs perfectly with a variety of dishes, from pasta to grilled meats, and can even be used as the base for creative leftovers.
By following the tips and instructions in this guide, you can ensure your garlic bread comes out perfect every time. Whether you’re cooking for yourself or for a crowd, Pepperidge Farm Garlic Bread is sure to be a hit. So, next time you’re in the mood for garlic bread, grab a loaf from your freezer and give it a try. You won’t be disappointed!